Showing posts with label Terrain. Show all posts

Monday, April 27, 2026

House Painting...


The house painting has started.

I bought a load of 2 for £4 acrylics from Hobby craft to paint the houses with after giving them a grey primer coat.  They will still need two coats each to get a solid finish.

Most will be painted in fairly muted colours with a few richer houses painted in brighter colours to add some contrasts.

After these have their walls painted, I will go back over them and paint the windows different colours.  Then, I will paint a number of card sheets different colours and cut the shutters out of them.

Finally, I need to cut the beams and spray them black and then they will be attached as well as the door surrounds.

After that it will be onto cutting and assembling the roofs and adding coloured tiles from prepainted card cut into strips of tiles.

Thursday, April 2, 2026

Back boards

Had a rethink over night and decided the trench pieces would look better with back boards, so I designed and cut some pieces this morning.


 This also means I could use the pieces as two sides of a tranch for other games if I ever ventures into WW1 in the future...


Wednesday, April 1, 2026

Lines of Investment

Been bouncing around from one project to another at the moment.  I did manage a Travel Battle game with my 54mm figures today, a report will follow.

I also managed to spend some more time today designing and printing some simple shapes to represent the initial investment lines for the Allies at Dendermonde - an earth bank thrown up to protect preparations.  These will be textured and painted to represent earth.  A couple of straights, a slant and a gun point.

Also played with how these will look and how I am doing in printing and painting for the overall siege lines.


Thursday, February 26, 2026

Starting the Siege Lines

 Created a few test siege line pieces for Dendermonde which will fit in with the hex terrain which covers 4' x 6' of the table.

Gabions are 3d printed -  a lot more to do to create 3 parallels and the approaches.


I had originally thought about building up an earth bank against the gabions but decided that I had enough to do already and the gabions look fine.

Thursday, October 16, 2025

Shutters...

I haven't been playing many games or finishing anything on the workbench for the last few weeks.

I have some French 25mm Minifigs Marlburians about 70% done, the French WW2 townhouses I 3d printed about 80% done and I've started on a couple of Marvel Crisis Protocol figures to see what might work for painting them.  But nothing is finished - I am managing a colour a day on something so they'll get there eventually...

 I've also been distracted this week by 2 minor ops in 4 days - nothing serious but they take time to get over. 

 I spent some time today designing and cutting some shutters for the Dendermonde houses.

Also cut a small add-on to raise the front wall design of the test house to match the others so the roofline is no longer visible.

Thinking I might paint the card before cutting the shutters so I don't have to paint them on the models.


Next up is cutting some tile strips  that I can roof with, overlapping the tiles - also cut from card and a surround for the doors.

I will also make some window surrounds without shutters for some of the houses for some variety.

Tuesday, July 29, 2025

3d Printing and a new toy

 I have been thinking for a while about upgrading my 3d printer.  I bought the Cubicon Style 9 years ago when I wanted to design and print Toy Soldier terrain and vehicle parts in ABS plastic so I could mould them in metal.

The Cubicon was expensive  but worked straight out of the box which meant I could spend time learning the software, rather than rebuilding the printer every time.

Technology has moved on and I have been keeping an eye on Bambu printers as a possible replacement as they have a good reputation and are a lot faster than the Cubicon.

I noticed a couple of weeks ago that Bambu had a sale on so picked up the Bambu A1 printer for about 20% of what I originally paid for the Cubicon.


The printer is easy to put together (just 10 screws or so to attach the two halves, plus some cables to plug in).

One of the reasons for wanting to upgrade the printer was that I was finding the 150mm cubic bed of the cubicon limiting on what I could print.  There is a lot of very good 3d printable terrain pieces now and I needed a larger printer to be able to print them - the A1 has a 256mm cubic bed.

In particular I have been looking at getting some French houses, etc for my WW2 setup and this enabled me to buy the 3dprintterrain WW2 buildings which I really liked the look of.  For £58 you get a huge number of very well designed buildings - I bought the 80th anniversary Normandy set.


The buildings print much faster than on my other printer - typically 4-5 hours for the main building and 2 hours for the roofs.  I am printing them at 0.2mm quality in Matte grey PLA which gives a good effect and minimises the print lines.

I have started painting them and am pleased with the results so far,


I want to make a number of town/village bases for WW2 games so I can play through the Blitzkreig scenarios in the Rapid Fire scenario book which require a fair number of buildings.  Most of the WW2 building I have are ruins rather than complete buildings.

I am also looking at printing some bits and pieces for my Gangster city (such as water towers for the roof tops and a train carriage to go with the existing train and tender) and some starship corridors and rooms for Star Trek skirmish games.


Wednesday, April 16, 2025

Playing with hills


Spent some time today playing with hills and how I want the hex terrain to work with flowing hills rather than occasional lumps on the battlefield.   I have been cutting extra tiles to provide unpainted supports beneath the flocked surface.


I recently added some stream tiles to go on the surface.

I am quite pleased with the way it is looking.


I have enough basic hex terrain cut to cover an 8'x 5'table which was my eventual aim. I need to cut a load more "support" tiles to build the hills up and more edge supports so that the hills can start right on the table edges.  But it is coming together...

Tuesday, February 11, 2025

Dendermonde - starting the Glacis


Spent some time yesterday working out the Glacis and how it would fit around the ravelins and across the ditch.

Cut most of it, but have run out of 4mm MDF (more on order) to cut the side pieces and one more top.

Next will be the back wall and walkway above the covered way.

Then cutting lots of 2mm slopes as triangles and trying to make them fit!

Monday, January 6, 2025

New Year - some sorting out.


I decided that if I really am going to crack on with the Dendermonde scenery I need to have it setup so I can tinker when I feel like it.


This is the city half of the board setup on a 4' x 6' at the end of the games room.  I decided in the end to go with 6' wide and not compromise the size of the city walls.

I still have space for a 6'x 4' table for games when I need it.

I spent some time yesterday cutting 11 more hex board to complete the base board and I can start to spray the city boards grey and the ditch boards brown (they will eventually be textured) to give a better feel of how the areas split up.

I spent some time drawing up plans for the glacis and laying big bits of paper to get a feel for size and shape - a couple more revisions should have the base areas of the Glacis worked out.

I have also planned where the citadel and the ditch surrounding it will go and settled on a 75mm x 95mm footprint for the basic houses.  I will also be adding a set of 1/4 depth houses along the back of the board to give the illusion of more housing, etc.


I printed out some Gabions I had downloaded and resized them to 75% to get what seems to be about the right size.  These will be combined with laser cut trench sides and either plaster or DAS to create siege lines.


Finally I started sorting through the Minifigs French and British Grenadiers that I picked up on Facebook before Christmas for less then £1 each.  I'll be adding French Grenadiers and some extra officers to bring the units up to 24 strength.  The painter has picked units with all the same facing colours, so it will be easy to mix them, and I'll probably repaint some stockings, etc to distinguish the units.

Still lots to get on with....

Monday, November 11, 2024

Basics of Dendermonde finished


Finished cutting and then assembling the Bastions and an extra piece of city wall.  It is all starting to look quite big now!  The city will eventually cover 4' x 5'.

I need to replace the longer piece of wall with one with a gate in it.

Next up will the demi-lunes, one with a road through it...

Tuesday, August 27, 2024

More laser cutting for Dendermonde


Spent some time today cutting bases for the Ravelins and bastions and working out sizing for the Demi-lunes.  


I have decided to redo the Ravelin without a hexed base as it is too hard to get them to line up correctly with the bastions without a lot of fiddling.


I also started on cutting the extra base tiles need to complete the 8' x 5' table.  The pictures show roughly what it will look like, the green area runs up to were the glacis will be, beyond that will be the ditch and behind the walls will be the city streets.

I am starting wonder about using removeable tape to stick the tiles down to the boards so I can move them on and off the table without having to pack them away each time.  Anyone worked with any removeable tape - I know you can get it for temporarily hanging pictures.

The glacis is proving a problem to design as it is so large and the bases for it will have to be made is several parts as will the grass slope.  I am wondering about laser cutting the back wall and covered way and firing platform and then making the rest out of foam board cut by hand.

Thursday, August 22, 2024

Bastion finished


I have finished cutting and assembling the first bastion.  This was fiddlier than the Ravelin and I had to bodge things in a couple of places.  I think it was because I made some changes to the flat models for the half-bastion cuts, rather than going back to the 3d model and changing that.

I might revisit the front wall shapes and revise them for the next two bastions to make it easier to assemble.

This one is a little bit off, but once textured and painted I am sure it will look fine.  It is 17" across at the largest point.

I need to add steps/slope at the back to access the reserve area and also steps for the main bastion walled area.

Next up are the city wall and a gated wall to fit between the bastions.  Then I will look at putting together the other two bastions and ravelins so I can start to work out the ditch.

After that, two different demi-lunes, one with a road running through it and then on to the glacis.

Finally, I will then start on the citadel and the buildings for the city.  I have scanned and "improved" the photos from the battle  magazine article to help me identify the number or buildings and their style so I can produce a similar look.

Wednesday, August 7, 2024

Bastion for Dendermonde


Back to working on the Dendermonde project. 

Finally had time to return to the Bastion model and refine it and test cut some pieces - took a couple of iterations of one of the pieces to get it right, but the basic pieces are cut and fit together.


The next picture shows how it fits together with the city wall.


Finally, with wall and a ravelin guarding it.


The figures are 25mm Minifigs French exploring their new structure.

Next steps are to cut the interior supports and the back walls out of 3mm MDF then to cut the sloping wall parts from 2mm MDF.

Wednesday, July 17, 2024

More Frostgrave Scenery

 Not been that well this week - probably Covid as it seems to be going round but did manage to finish off another scenery tile for Frostgrave.

This is the diorama base that comes with the Reaper diorama "Dragons Don't Share".  I've left the holes for the dragon to stand in so I can still use it as a display piece when I get round to painting the figures for it.


We have started a Frostgrave campaign amongst three of us at the Guildford club so I have an incentive to exapnd on the terrain choices.


Wednesday, February 28, 2024

Playing with Ravelins

 I made a start of designing the Ravelins for the Siege of Dendermonde project quite a while ago but got stuck trying to visualise exactly how they were going to fit together, how the walls would work and exactly what internal supports I would need.

So, I cut some samples pieces this morning.  The base out of 4mm MDF and the floors and structure out of 3mm MDF.


The individual pieces are shown above.  The base is designed to fit in with my hex terrain system.


These pictures show the initial assembly and how the the pieces fit together.  I glued the wooden pieces together and used bits of card to support them.

Then I cut some very rough pieces of card to get a feel for how it would look with walls.


The walls are very rough and I need to work out the joining angles before designing them - they will then be cut from 2mm MDF.

The back of the ravelin with have a set of 3d printed stairs to the top platform.

The next picture shows some British troops manning the Ravelin while Austrian grenadiers march along the outside ridge to get to a bridge to the Glacis.


The final picture shows how the base tile will fit in with the hex terrain.  In the finished piece it will be surrounded by ditch tiles, which will be brown and then there will be other ditch tiles that fit over them showing the flooded ditch.


Wednesday, August 30, 2023

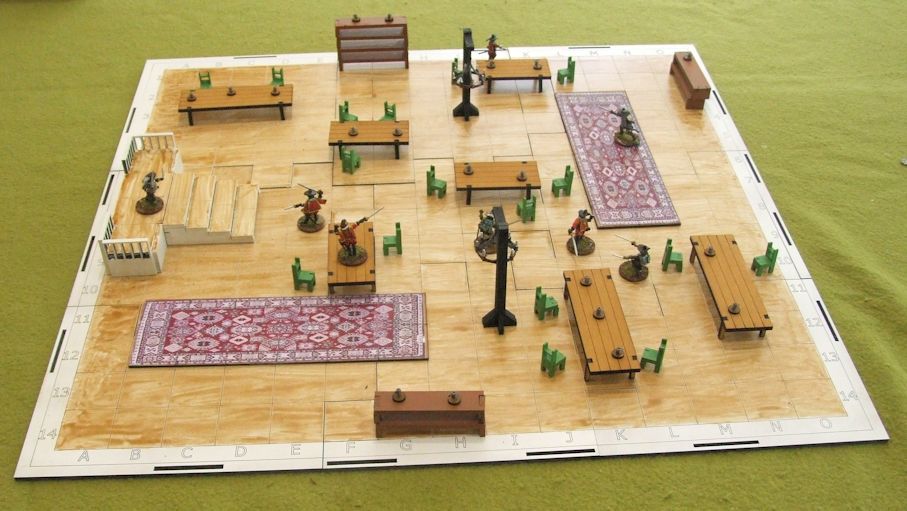
Swashbuckler board complete


I have finished painting all the components for Swashbuckler.  Everything made by me except the tankards which were bought from an ebay seller.


I will add walls at some point but the game is playable now.

It all fits into one box with rules, dice, figures and everything you need for the game.

Wednesday, August 23, 2023

Swashbuckler by Yaquinto Games

 I played Swashbuckler when it came out in 1980.  It was one of the "Album" style games that Yaquinto produced where the board contains the game pieces.

I picked up a copy on ebay a few years back on a whim to see if I could convert it to a figure game to use with my Three Musketeers collection.

A random discussion over a boardgame a couple of weeks ago led to us trying the game out at the Guildford Club last week.


It was great fun and all 4 of us enjoyed it. You plot your moves for the turn over 6 phases and write them down in advance, so things inevitably go wrong.  There was a lot of mug throwing and chair tossing and Ray's character eventually died from being kicked after I got fed up with missing him with a sword.

The other players' were keen when I mention a miniatures version and I spent some time this week thinking about it.  I sketched up a board layout yesterday and spent today laser cutting the pieces.


Encouraged by the look of the board which uses 40mm squares, I started work on the other pieces and added:

Tables, Chairs, Carpets and the Balcony and Stairs.


I have drawn up the shelving units and just need to cut them.

Then I need to decide on tankards - I might 3D print them but experiments with using some files off Thingiverse and scaling them down haven't worked that well.

Once I have mugs it is pretty much ready to play - I will paint it at some point  and I will eventually add walls and might redo the Balcony as it isn't quite right.


Monday, July 31, 2023

Frostgrave Board

 I finally have enough terrain 3d Printed to fill a 3' x 3' board for Frostgrave.


Now, if it stops raining I can get the last bits undercoated and painted.

Using LOTR figures to make up the soldiers I think I also have enough figures for 2 bands for a playtest game as well...